
Facebook ads or now we call them Meta ads, provide a number of powerful ways to identify and target audience for any business. One such option is custom audiences in Facebook ads. In this article we will learn how to create custom audience in Facebook ads and use them across Meta technologies to get more leads or sales for a business.
What is Custom Audience in Facebook Ads?
Custom audience is basically a targeting option in Facebook ads using which you can find people who have already engaged with your business in some form and target them across Meta technologies (Facebook and Instagram). When we say engaged with your business, it can be just a like or share of your Instagram post, watching your videos, filling your lead forms, your website or app visits or those people who are your existing customers or have shared their information like mobile number or email address with you.
So custom audience can either be from your sources like website, app, offline data etc. or they can be from Meta’s sources like your followers on Instagram or those who liked your posts etc.
Custom audiences can be broadly classified into 4 groups:
- Your website visitors
- Those who have installed your app
- Those who have engaged with your Instagram or Facebook posts/ads
- Your existing customers or leads
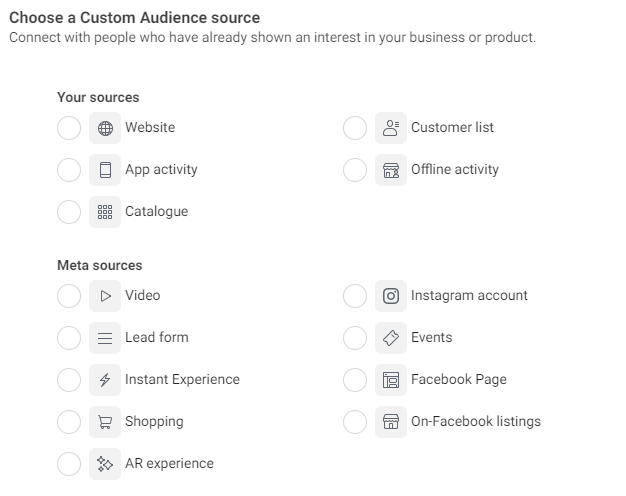
Below is a screenshot of all custom audience creation options in Meta Ads
How to Create Custom Audience in Facebook Ads
Now that we know what is a custom audience, let’s see how to create one and use in our ads. Let’s take the example of website visitors for this tutorial. Please note that to create a website custom audience, you need to create a Meta pixel first and it should be connected to your website. Here are the steps to create and activate a Meta pixel Below are the steps:
- Go to audiences section in ads manager and click on create audience
- You will get a drop with 3 options: Custom audience, lookalike audience and saved audience
- Click on custom audience
- Once you do that, you will see a pop up with all the custom audience options as shown in the image above
- As we are creating website audience in this tutorial, select the ‘website’ option
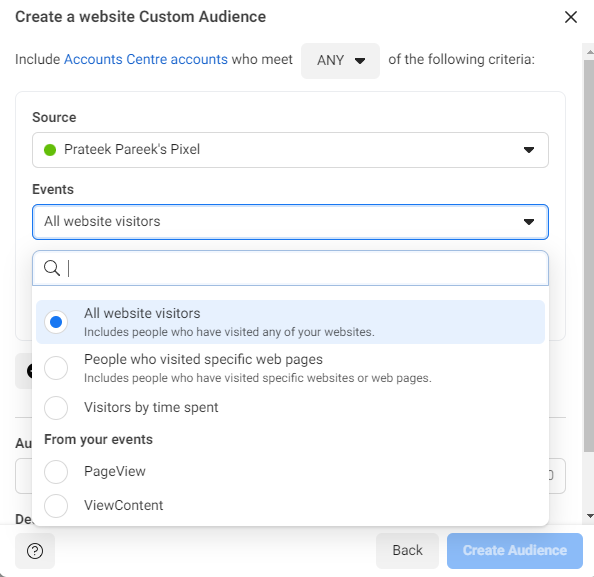
- Click on next and in the next section you can define your audience by selecting the events and number of days you want to target
- There are 3 event options given by Meta: All Website visitors, people who visited specific pages and visitors by time spent. See the screenshot below for these 3 events. You can also create your own events using your pixel. I have created ‘Page View’ and ‘View Content’ events
8. If you want to retarget all of your website visitors, then select that option and in the retention section and just mention the number of days. For example , if you want to retarget those people who visited your website during last 30 days then mention 30 in the retention section.
9. Once done, define the audience name. Keep simple names that you can remember because you will create multiple audiences for your ad campaigns and it should be easy to recall the objective for each audience
10. Click on create audience and you are all set to use these audience in your ads. Whenever you again visit your audiences section, you will be able to see this audience. Also when you are defining the audiences in the ad set while setting up your campaigns, you will be able to find these audiences
11. In the above example we have taken a very simple scenario to target all website visitors. However you can create very specific audiences as well using the other 2 options
12. You can add or exclude people who visited specific URLs on our website with ‘People who visited specific web pages option.
13. With the time spent option, you can target top 5,10 or 25 percentile visitors based on time spent
All these are very powerful options to retarget specific visitors on your website. You can even customize your ad creatives for different audiences based on their interest. For example if you want to retarget those audience who added products in cart but didn’t make a purchase, you can define such audience and target them with an offer
Video Tutorial
We hope you were able to understand how to create audiences for Facebook ads. In this article we covered example of only website audiences and gave you a preview of other audiences, however it is very similar to create other audience types as well